Introduction
Apple released the first SwiftUI in 2019, with a new powerful way to build applications with a declarative and state-driven style. In this post, you will learn about the new features in SwiftUI 4 for iOS 16 and how to get started with SwiftUI in your next project
SwiftUI is a user interface toolkit to design the most imperative and great looking applications in a declarative way across all Apple platforms with powerful swift.
Requirements:
- iPhone/iPad iOS 16
- MacBook macOS Catalina 13.0
- AppleWatch WatchOS 9
- Apple TV tvOS 16
- Xcode 13 or later
What is New in SwiftUI 4 for iOS 16?
Earlier kicked off WWDC22, as expected Apple announced a new version of SwiftUI(SwiftUI 4) comes along with new Xcode 14 and iOS 16.
This update comes with many tons of features to help Swift developers to design the most attractive apps with minimal code.
1. Charts
Swift Charts is a powerful SwiftUI framework to represent your data into informative visualization. With swift charts, we can build effective and customizable charts with minimal code.
A. Bar Chart
The Barmark is used for creating a bar chart. The BarMark view is using x and y values. The x value used to define x-axis and y value used to define y-axis.
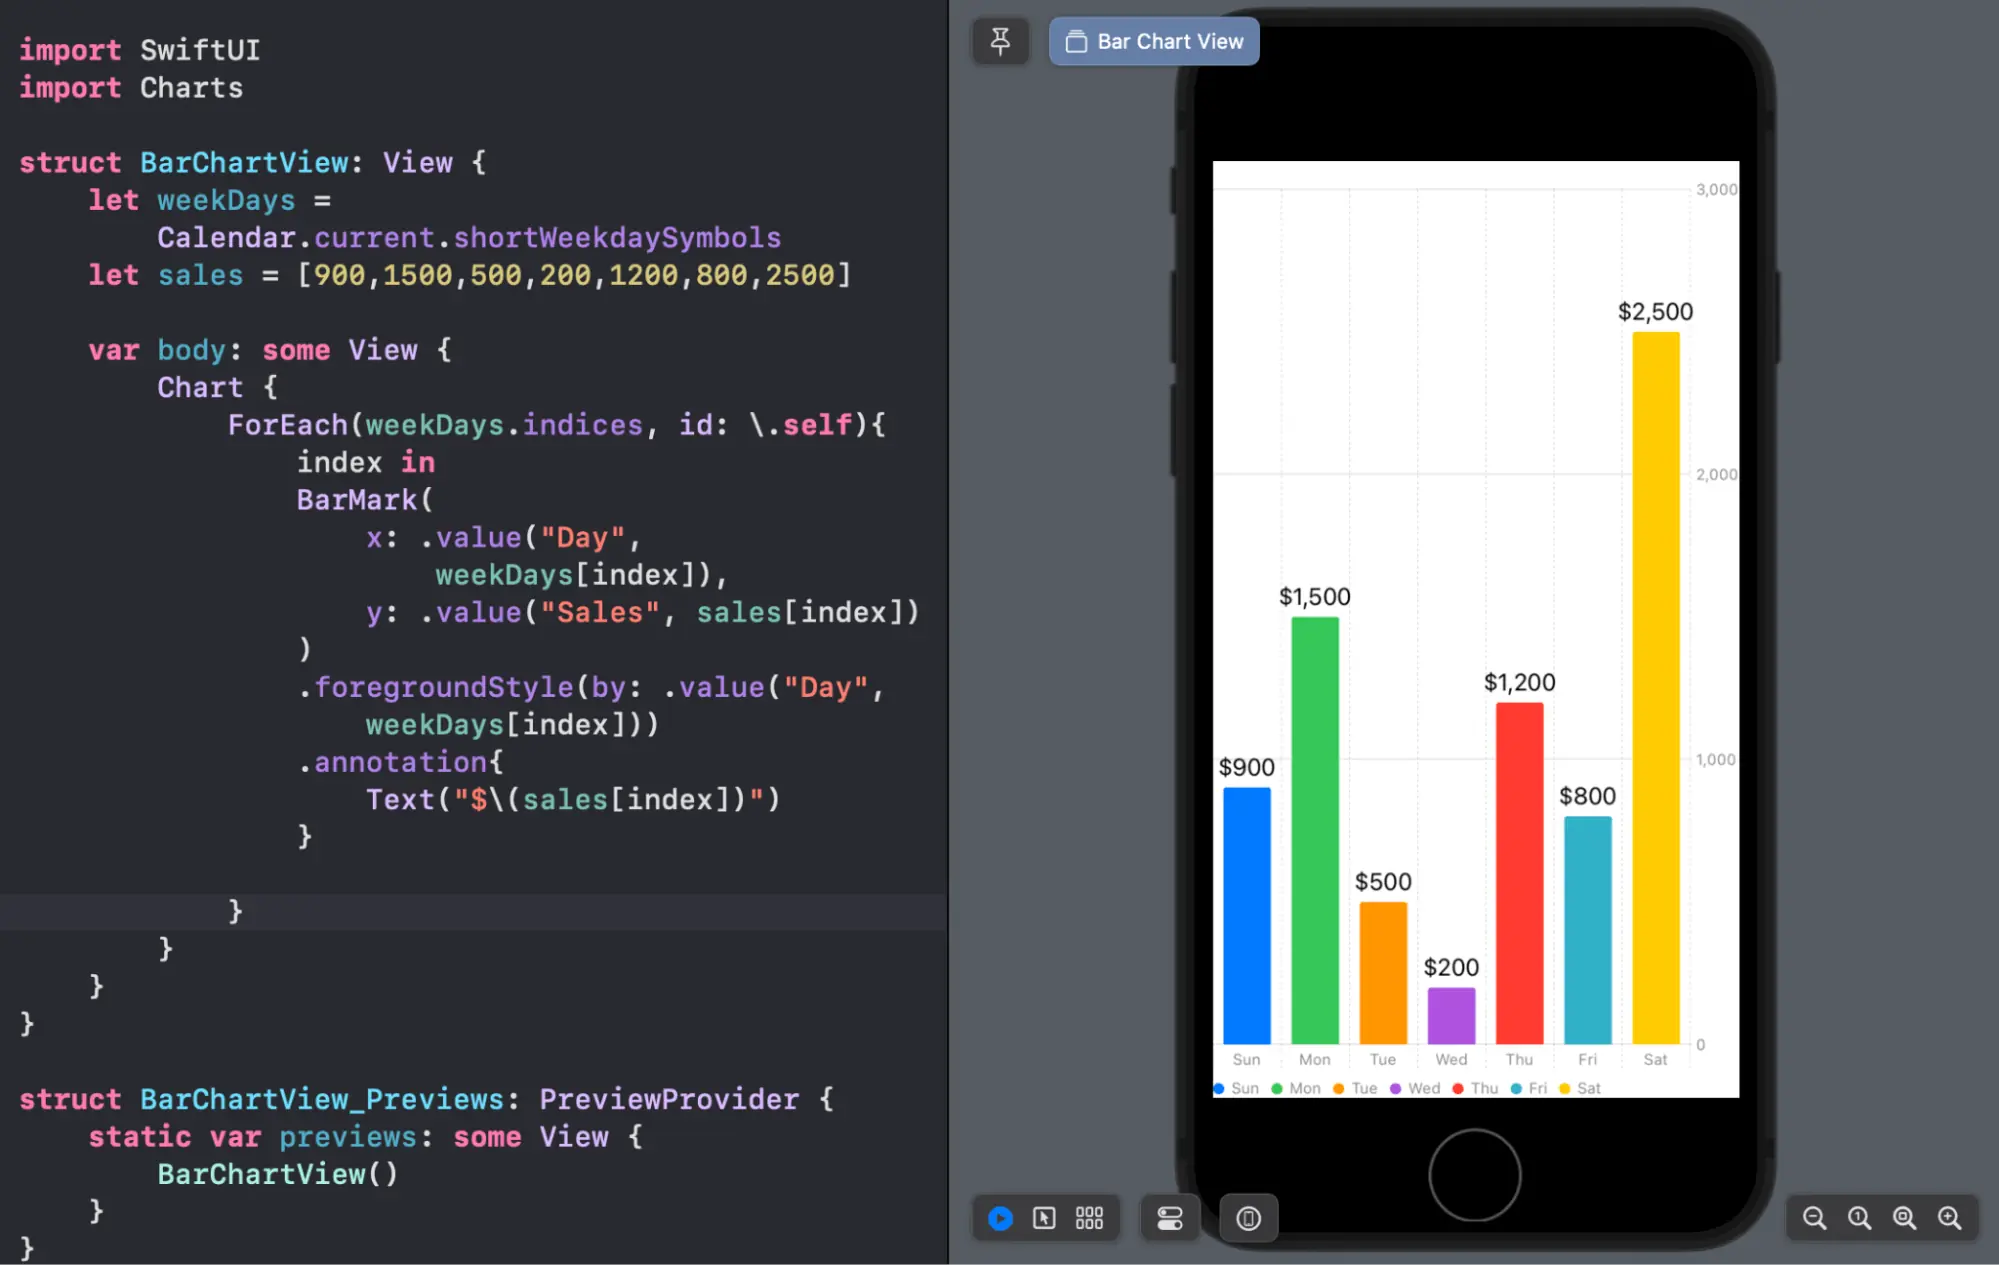
Using above code simply you can create your own bar chart. We can use chart API with collection of data instead of holding chart data.
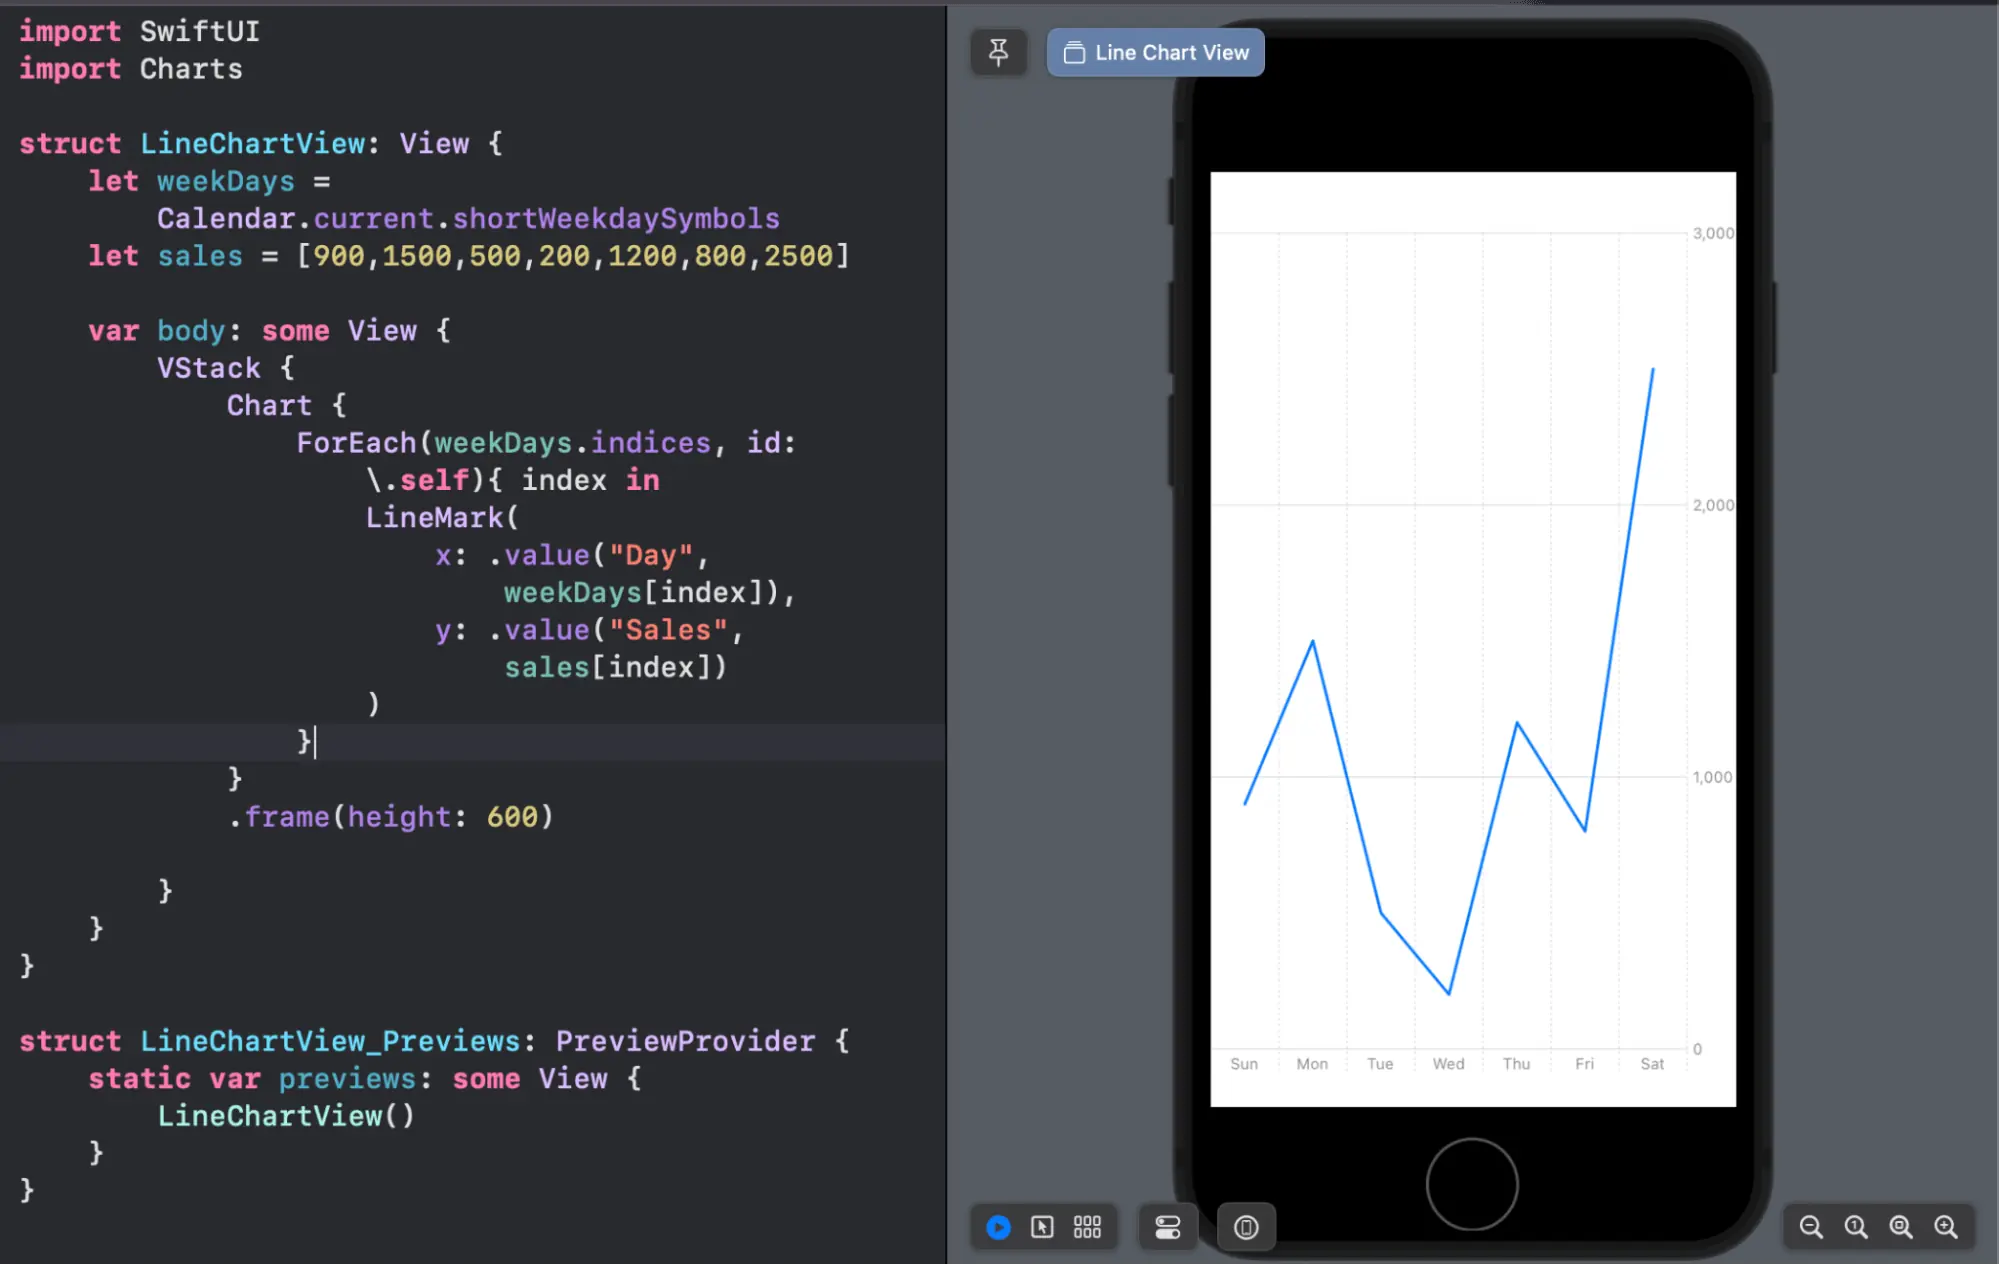
B. Line Chart
The LineMark is used for creating a line chart. By switching BarMark to LineMark you can convert your bar chart into a line chart.
We can simply use LineMark to create line chart using below code :
Chart{
LineMark(
	x:  .value(“Day”, “Monday”),
	y:  .value(“Sale”, 100)
)
}
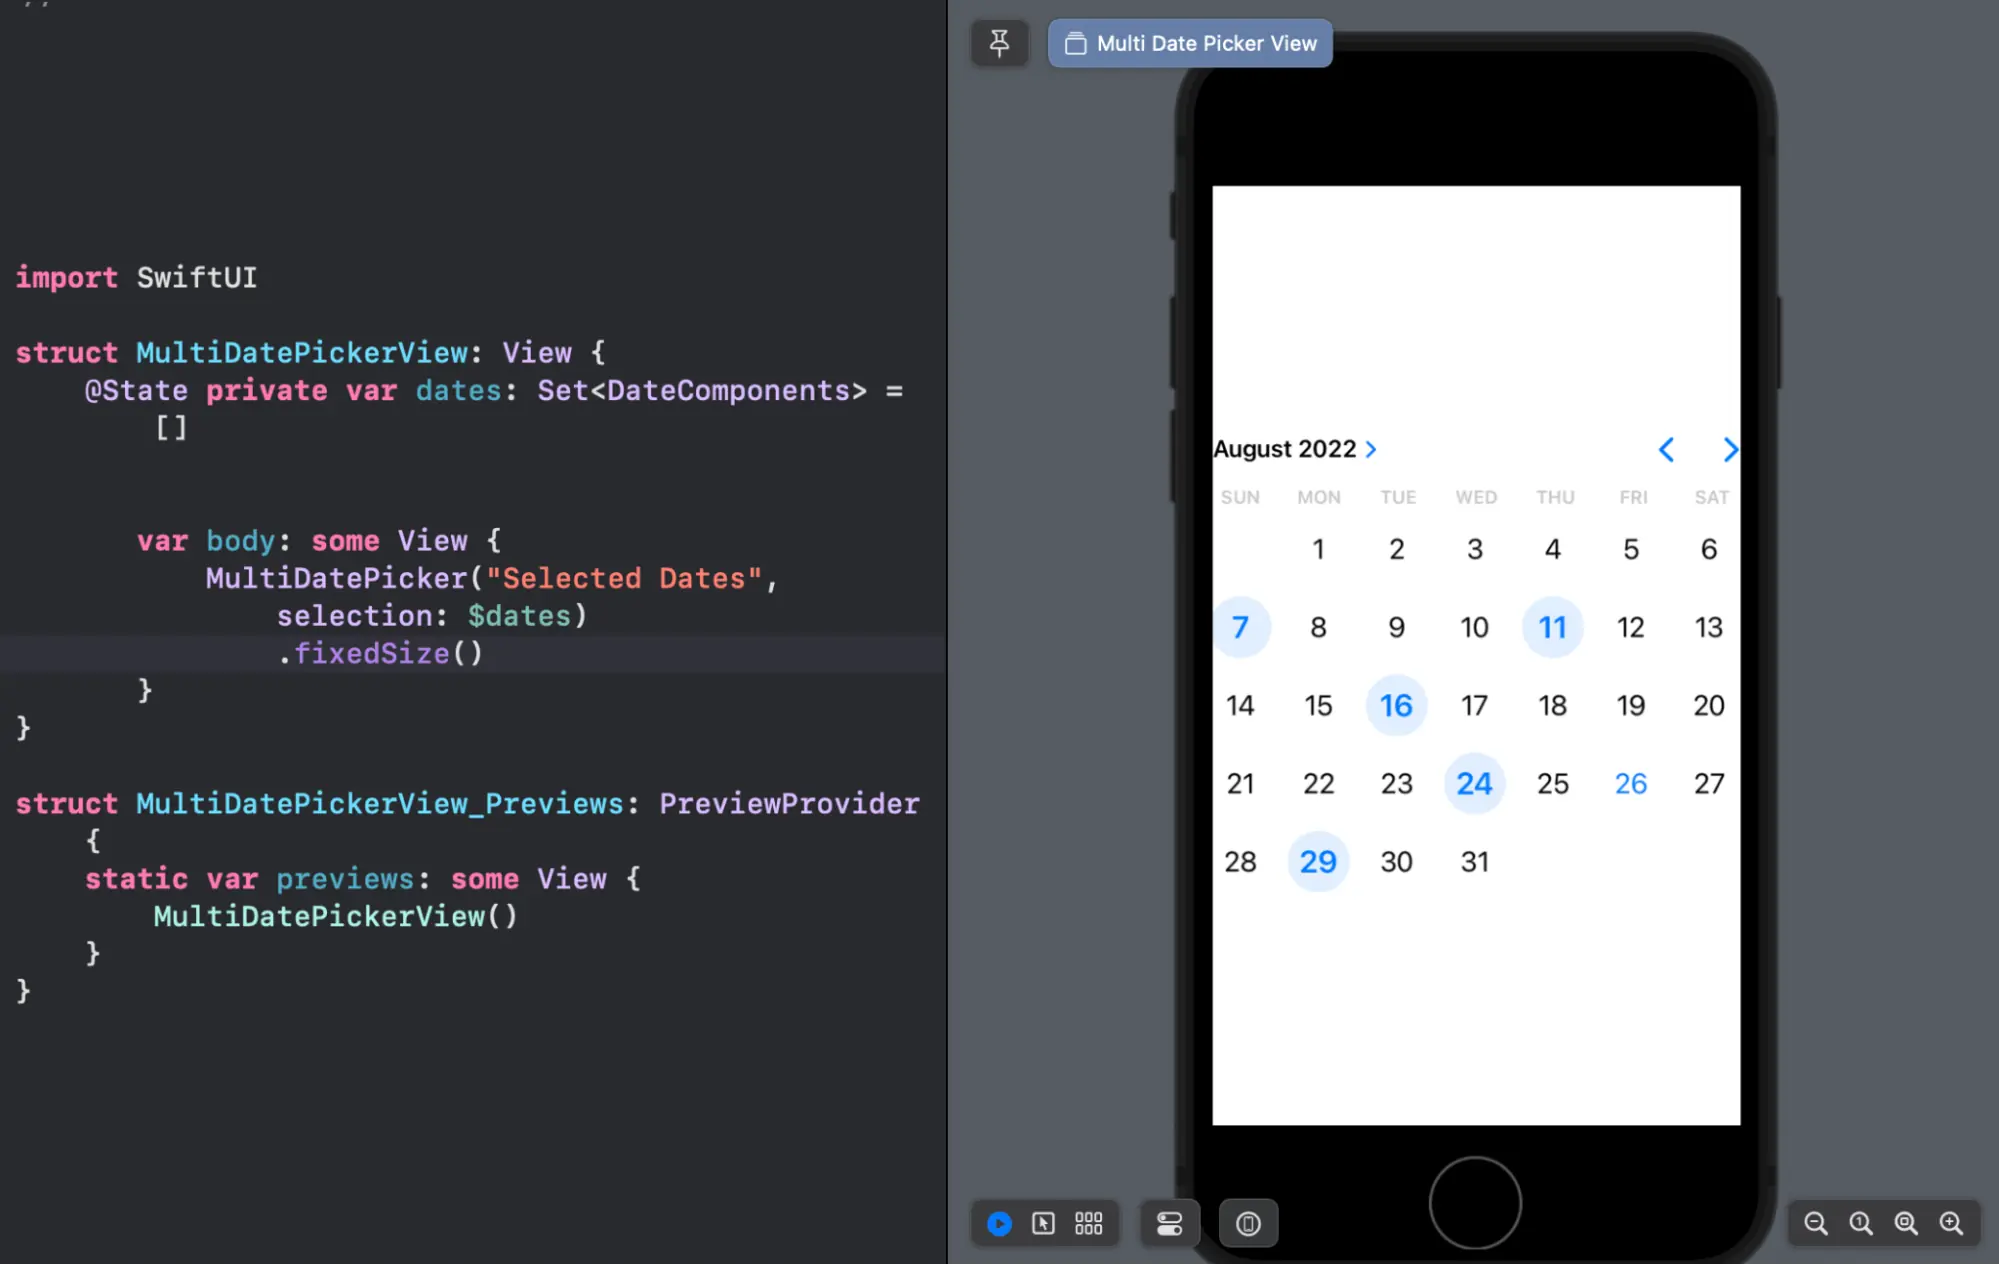
2. MultiDatePicker
SwiftUI 4 iOS 16 comes with a new amazing feature for a calendar view called MultiDatePicker. Now we can select multiple dates as dictated by multiple highlights.
3. NavigationStack and NavigationSplitView
NavigationView is soft deprecated in iOS 16, it is replaced by NavigationStack and NavigationSplitView. Major changes in Navigation API, navigation stack allow you to push and pop view from stack, manage navigation path, manage navigation destinations for managing view navigation programmatically.
Navigationview simply works similar to navigation stack. By below code we can replace to navigationview to navigationstack.
NavigationStack {
NavigationLink {
                	Text("Details")
            	} label: {
                	Text("Tap Here")
            	}
}
To handle multiple navigation from list simply we can use a navigation stack with List.
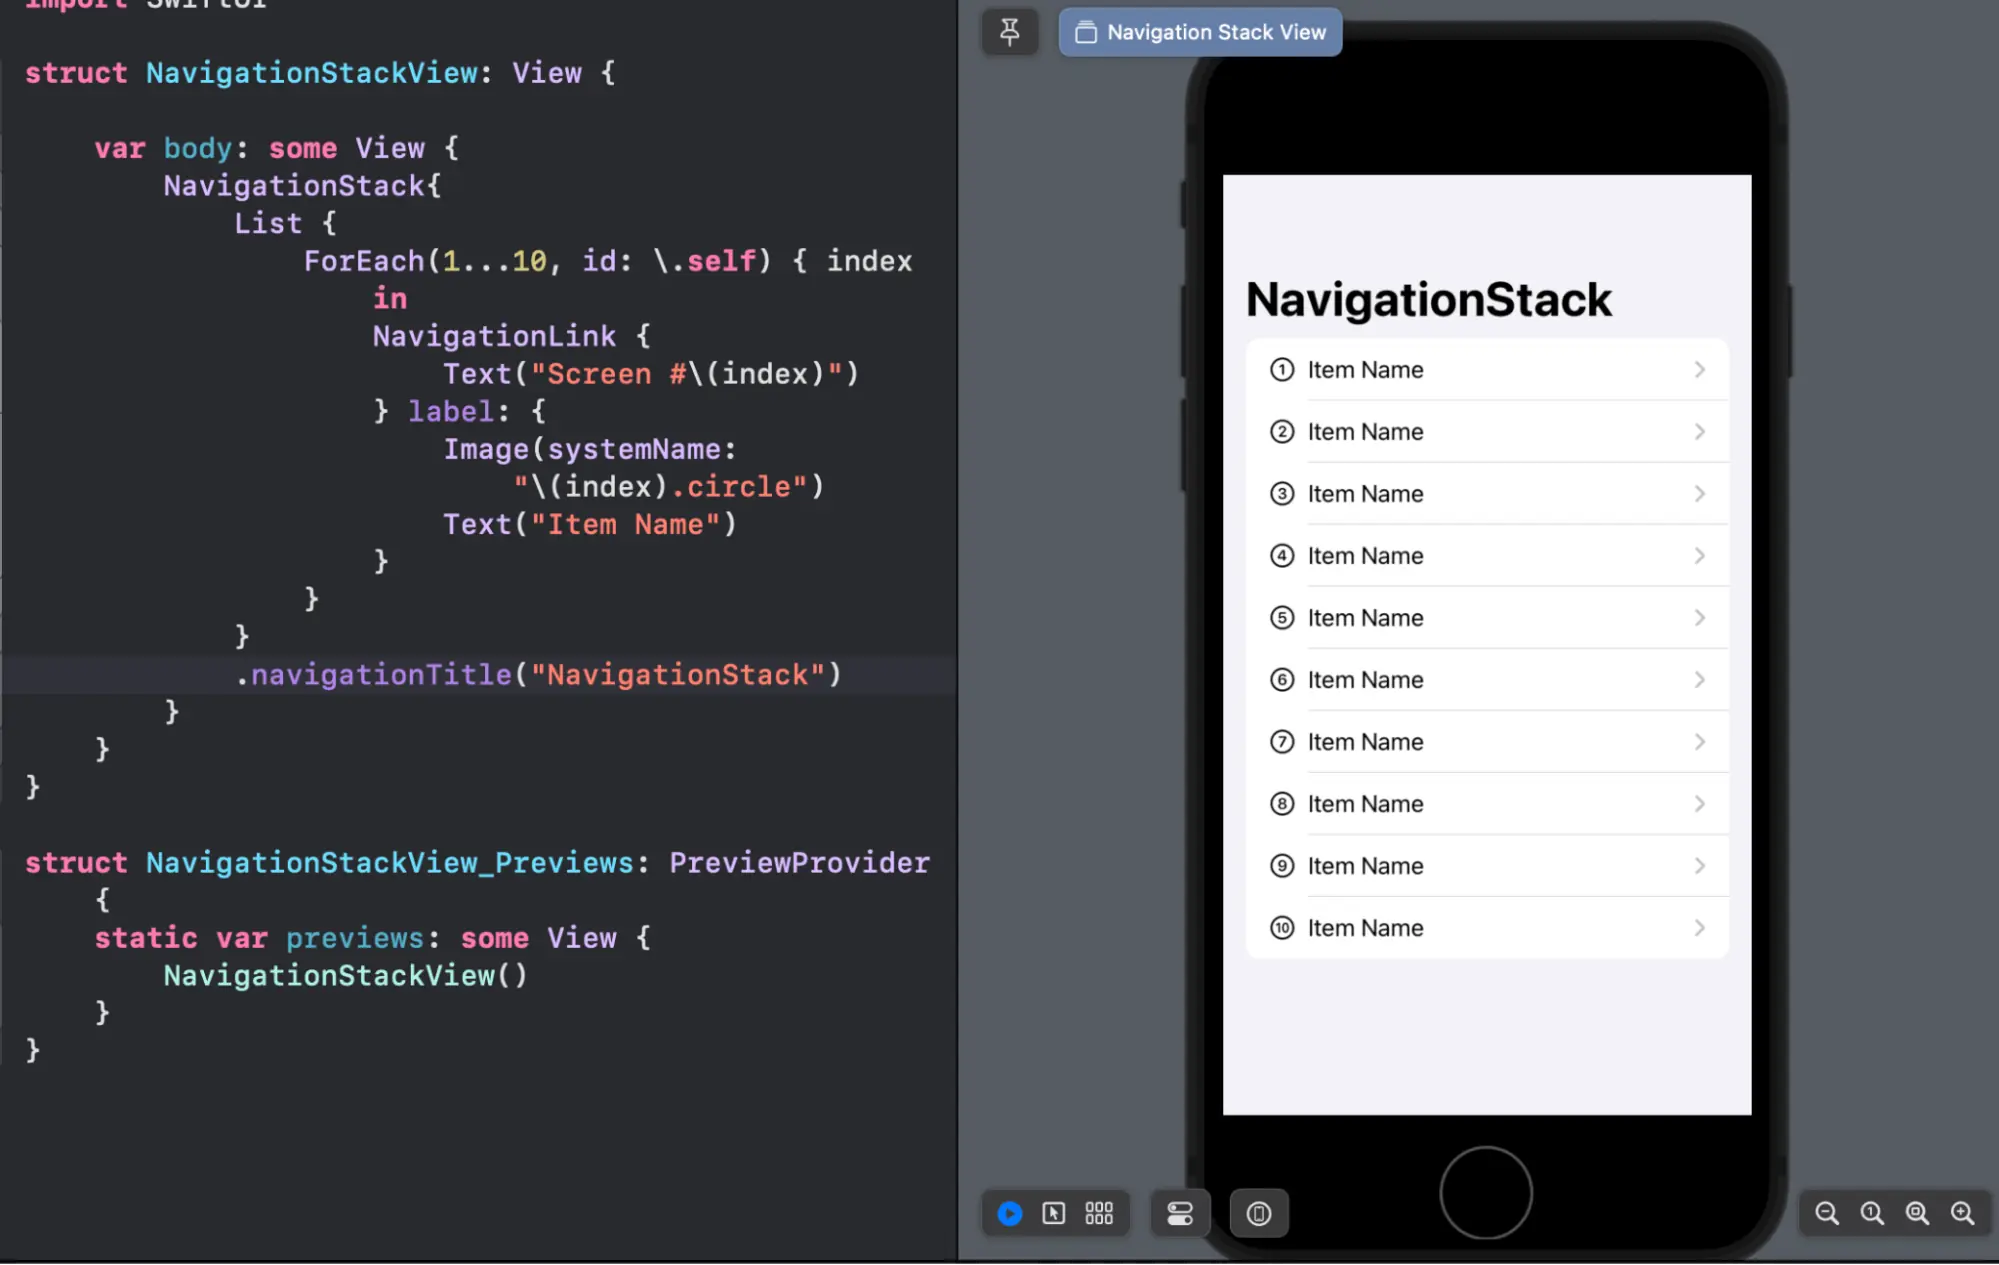
In iOS 16, navigationLink is improved . instead of specifying a destination view, it can take a value that represents a destination. Navigationlink pairs with navigationDestination as per value type. In the below code we have three navigationDestination modifiers, one for text item, second for integer type item and third is for color object type item.
import SwiftUI
struct NavigationStackView: View {

    var body: some View {
        NavigationStack{
            List {
                NavigationLink(value: "Text Item") {
                    Text("Text Item")
                }
                NavigationLink(value: 100) {
                    Text("Integer Item")
                }
                NavigationLink(value: Color.black) {
                    Text("Color Item")
                }
            }
            .navigationTitle("NavigationStack")
            .navigationDestination(for: String.self) { item in
                Text("This is the detail view for \(item)")
            }//: text
            .navigationDestination(for: Color.self) { item in
                item.clipShape(Circle())
            }//: color

            .navigationDestination(for: Int.self) { item in
                Text("This is the detail view for Integer \(item)")
            }//: Interger
When we select a particular item from the navigation stack, SwiftUI will first check the item type from the value of the navigation link, and then call up the destination view which is mapped with a specific item’s value type.
This is how navigationStack works with the specified navigationDestionation modifier using destination type.
NavigationStack with Destination Video
4. ShareLink
iOS 16 introduced a new ShareLink for SwiftUI, this allows developers to present a share sheet. It is very easy and requires less code. Here is an example,
private let urlToShare = URL(string: "https://www.oneclickitsolution.com/blog")!

    var body: some View {
        ShareLink(item: urlToShare)
    }
Basically, we can provide simple ShareLink control to share data, this will provide a default share button, when it is tapped we can see application will open the share sheet on screen.
We can customize the share button by providing our own text, check below example,
ShareLink(item: urlToShare) {
            Label("Share From Here", systemImage: "square.and.arrow.up.circle")
        }
We can control the presented sheet size using presentationDetents. presentationDetents provides multiple options to present sheets of multiple sizes.
ShareLink(item: urlToShare) {
            Label("Share From Here", systemImage: "square.and.arrow.up.circle")
        }
        .presentationDetents([.medium, .large])
This is how presentationDetents works to update the share sheet.
5. Expandable Textfield
iOS 16 has resolved the most irritating problem to make multiline text fields with placeholders using SwiftUI. SwiftUI 4 came up with an expandable text field simply using the .lineLimit control item.
TextField("Please enter your name", text: $userName, axis: .vertical)
                .lineLimit(5)
Now we can set the number of the line support to textfield, once the number of lines reaches their maximum limit it will start scrolling similar to swift’s TextView. We can set a minimum and maximum number to set a line limit. Here we can set minimum and maximum limits using 3 dots $minNum…$maxNum.
TextField("Please enter your name", text: $userName, axis: .vertical)
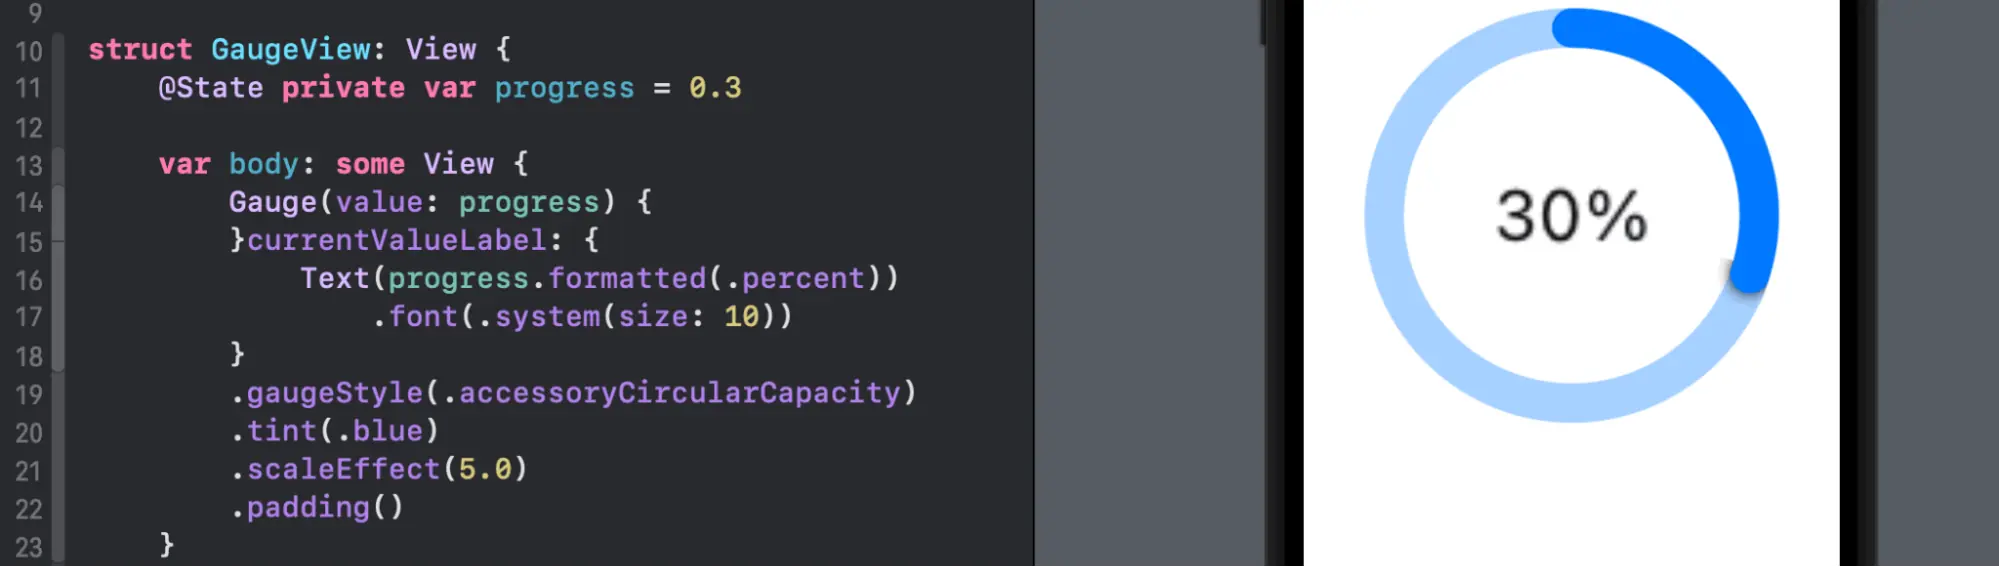
.lineLimit(1...3)6. Gauge
SwiftUI introduced a new view called gauge, gaude is used to display progress view.here is a simple way to create gauge with a view.
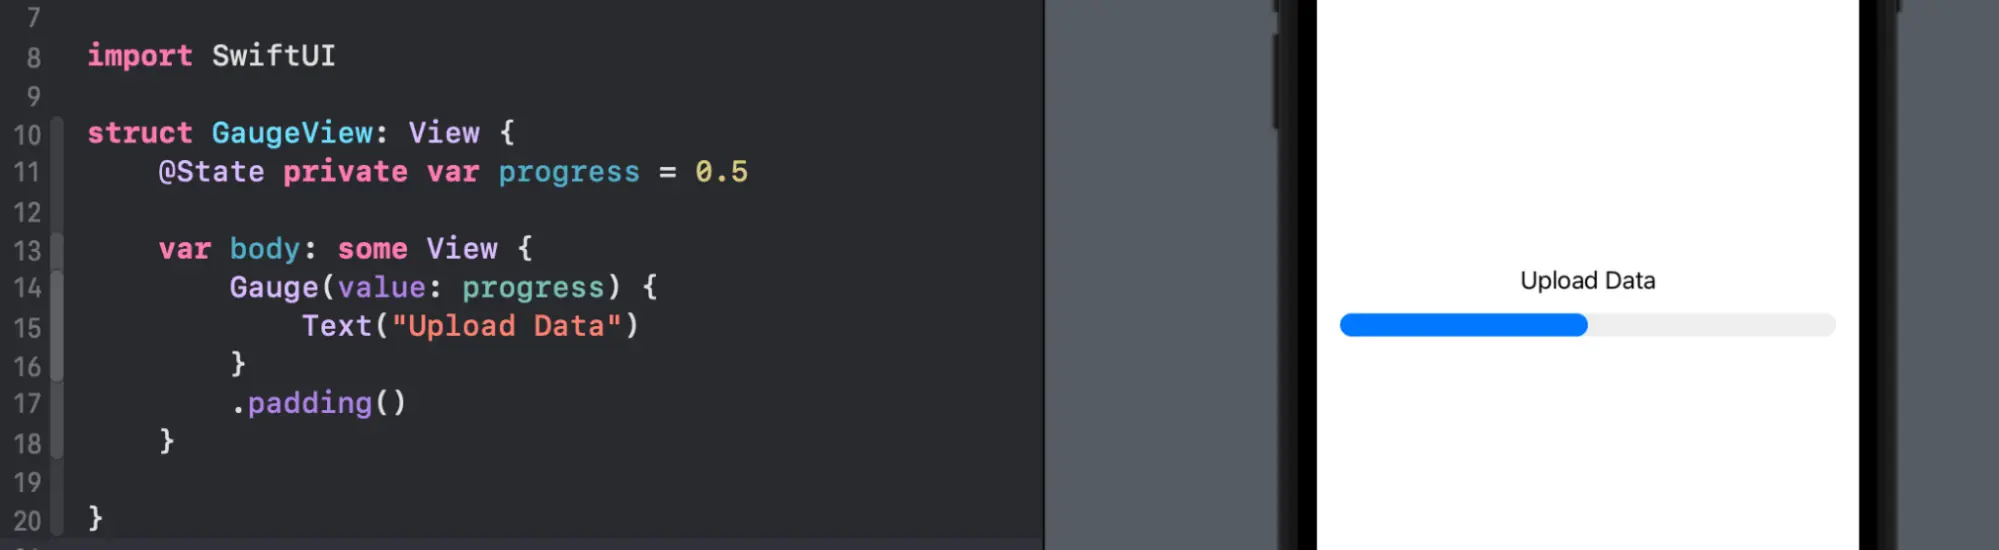
We can simply provide current, minimum and maximum values to guade to display with progress view.
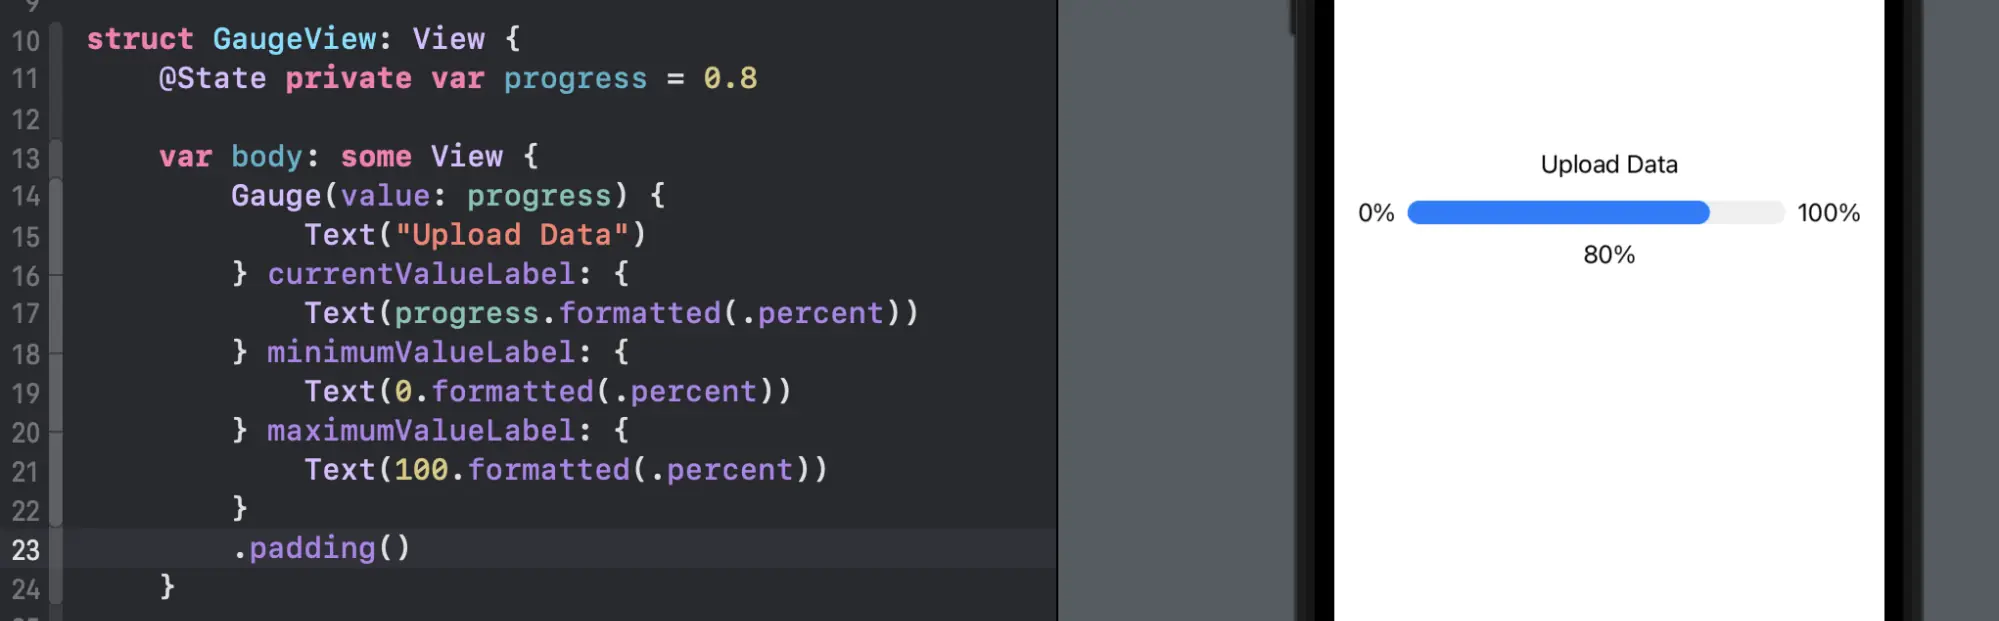
We can provide custom style to guage to display progress like liner, circular, with or without capacity etc.
7. AnyLayout
Layout support to update the view layout of the container without disturbing and destroying other object’s states. We can create a layout where we need to change that layout between horizontal and vertical.
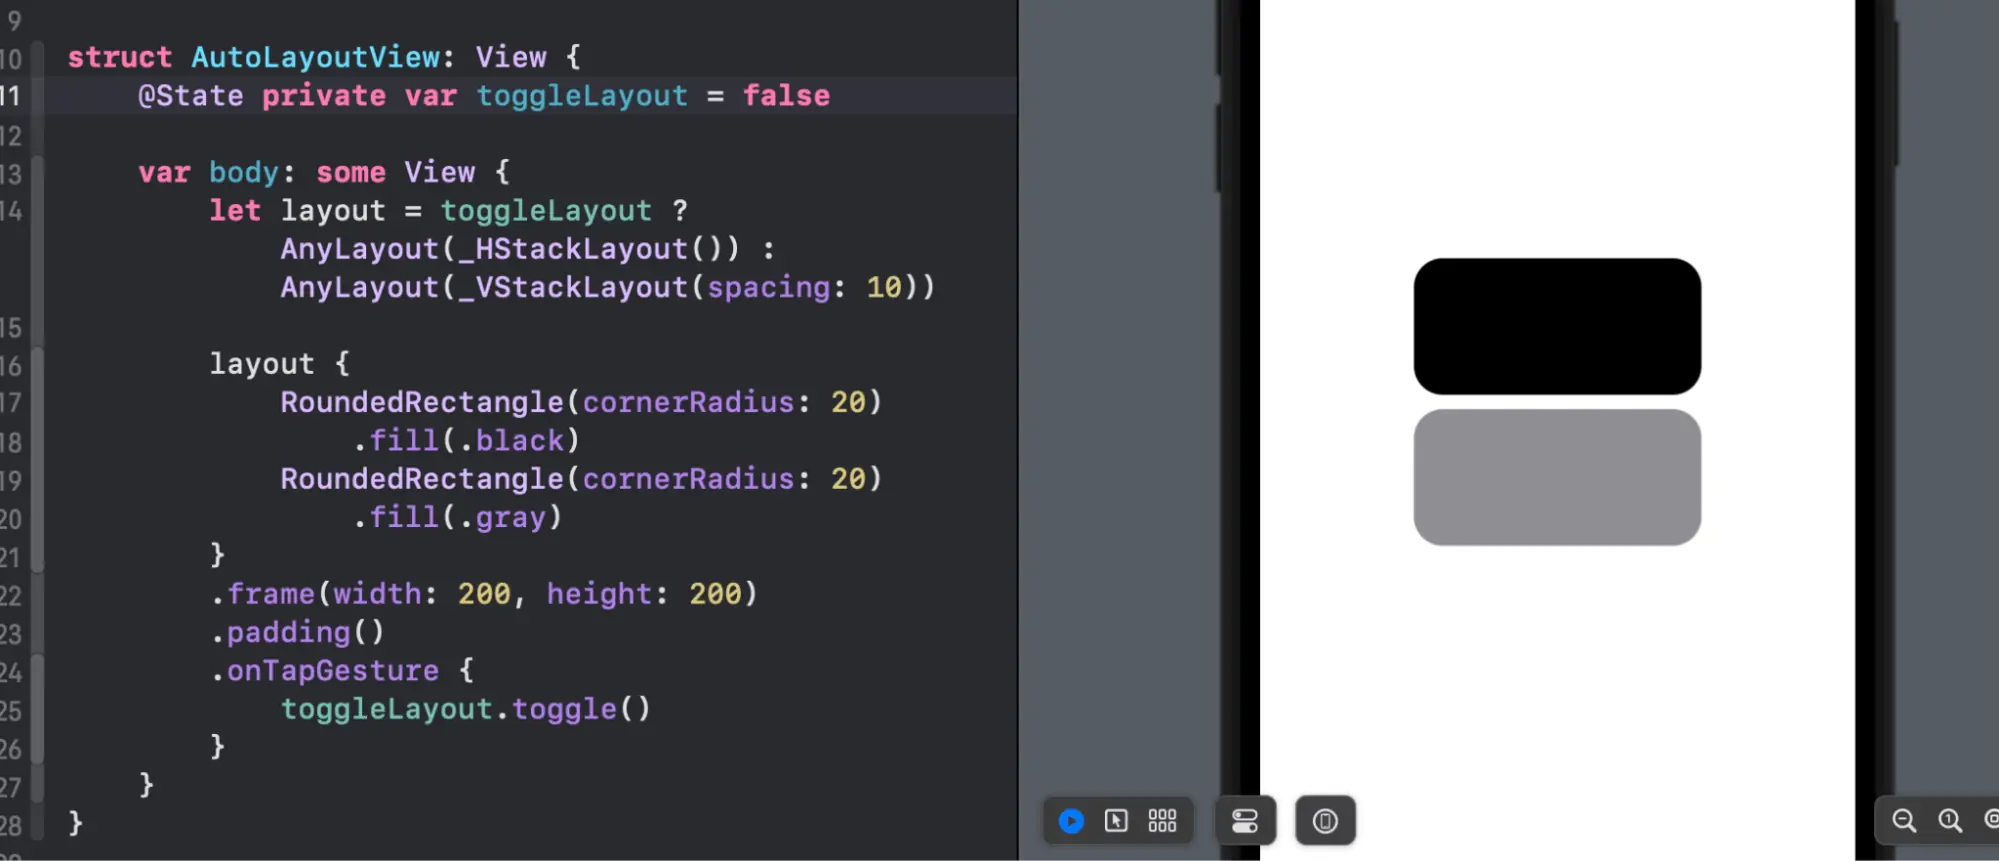
In the above code, you can create one toggle to update the layout when the toggle value changes. If the toggle is true layout will be set vertically and if the toggle is false layout will be set horizontally as you can see in the above example. We can use this layout where our application supports landscape and portrait modes.
8. Gradient and Shadow
A new version of SwiftUI came up with a new way to set gradients and shadows to views. Simply add gradients with colour and swiftUI will automatically generate a gradient layout for view.
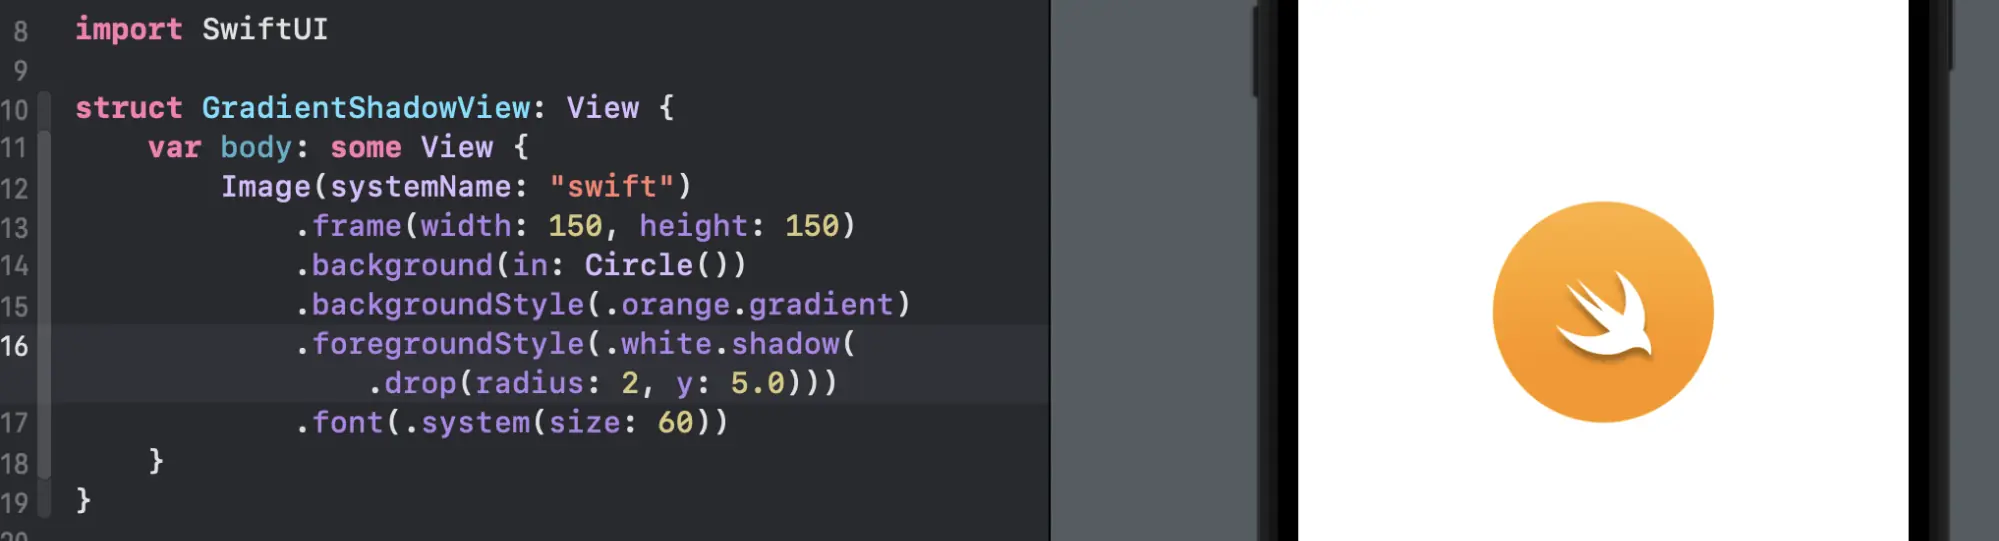
We can also use a shadow modifier to simply add a shadow effect to the view. There are two types of shadow drop and inner. Here are examples of adding shadows using the below line of code.
- Drop shadow
.foregroundStyle(.white.shadow(.drop(radius: 2, y: 5.0)))
- Inner shadow
.foregroundStyle(.white.shadow(.inner(radius: 5)))
9. Grid API
SwiftUI 4 introduced a new Grid API to arrange the grid base layout. We can arrange the same vstack and hstack layout using a grid. The grid view makes it easier than VStack and HStack.
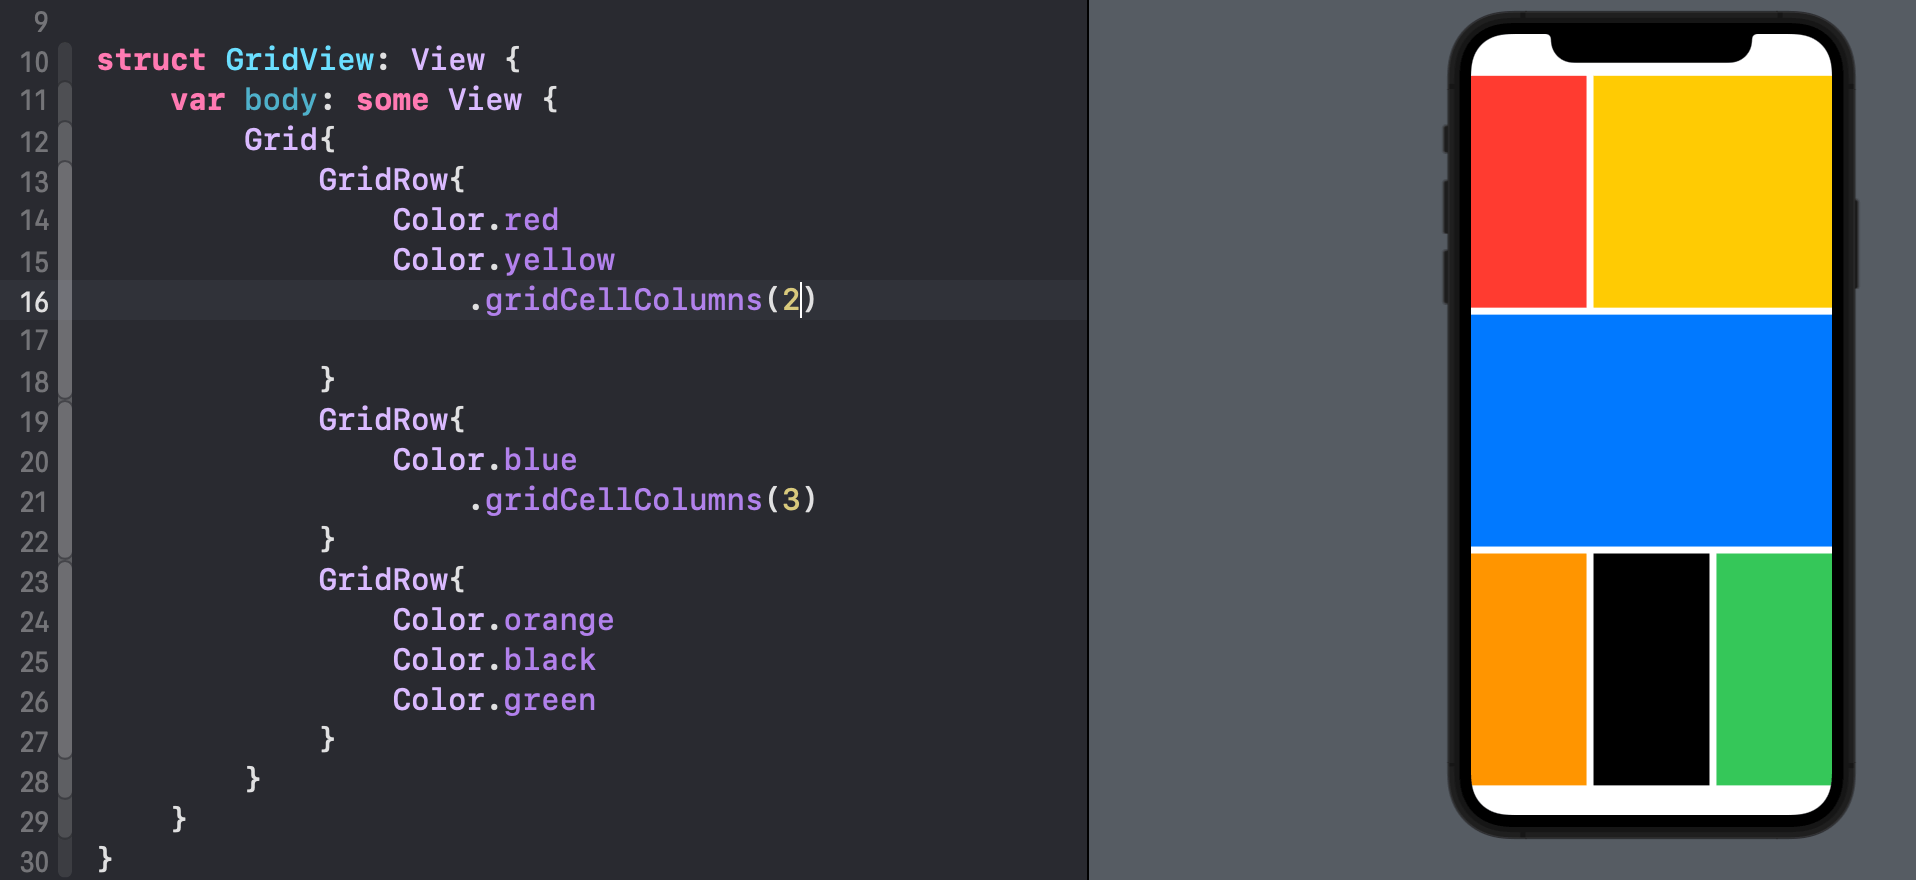
It uses GirdRow inside Grid that embeds grid cells. Let’s say we have a maximum of 3 columns in the grid, now in the first row we have two columns and we want to span it across 3 columns, simply add gridCellColumns(2) and then the second item of the row will span across 2 columns and same for other GridRow.
Summary
Like every year this year, Apple announced tons of amazing features, improvements, and fixes with the SwiftUI framework. Chart API, revamped navigationView and other many features to make app design look more attractive, declarative and smoother experience all around.

FAQs in SwiftUI 4 for iOS 16
No, Apple has introduced too many new components in swiftUI directly on top of existing UIKit components, they are new component rendering in SwiftUI not in UIKit.
No, Apple announced huge amounts of new functionality in the last few WWDC. Apple is still talking in WWDC about new features in UIKit , you are safe there is no risk about losing UIKit.
Yes, SwiftUI is incredibly faster than UIKit, it provides a preview on development time so you don’t need to run your code frequently to test UI and features. SwiftUI provides more features in less code and without having any extra work.
It’s hard to provide a straightforward answer to this question but if you are planning to build a new iOS project then go for it. I am sure you will never regret it.