How Much Does It Cost to Build an App Like Airbnb?
With the rise of the sharing economy and the popularity of platforms like Airbnb, it’s no surprise that many startups are looking to launch their rental marketplace apps. The question is: How much does it cost to build an app like Airbnb?
While there’s no exact answer to this question costs can vary widely depending on your business model. here are some insights you can take toward creating a rental marketplace app like Airbnb.
What is Airbnb App?
Airbnb is a community marketplace that enables hosts to rent out their spaces and travelers to book them. It’s a way for people who need a place to stay for an extended period to find homes away from home, or for those who want to earn money by renting out their own spaces.
Airbnb was founded on the idea that people should be able to pay for a room in someone’s house instead of paying for a hotel room. This allows travelers to get more bang for their buck while staying somewhere new!
Airbnb was coined by Brian Chesky, Joe Gebbia, and Nathan Blecharczyk in August 2008. The first version of the website went live in August 2008, but since then has grown into its brand with more than 2 million listings in over 190 countries.
How Does Airbnb App Work?
Whether you are traveling for business or pleasure, Airbnb can help you discover the perfect place to stay that meets your needs and fits your budget. On Airbnb, you can find a variety of accommodations including rooms, apartments, houses, and even tree houses!

You’ll be able to get data about each listing before booking such as pictures of the space and descriptions from other travelers who have stayed there. Everything on Airbnb is transparent so you don’t have to worry about hidden fees or extra charges once you’ve booked a room through any website.
Airbnb hosts use the platform because they want to meet people from all over the world while providing them with a unique travel experience they’ll never forget.
Hosts make money by sharing their homes with travelers who would otherwise not be able to afford to stay at hotels or motels in those same cities (or even countries). Guests can save money by staying with hosts instead of paying high hotel prices.
How to Create an App Like Airbnb?
Have you ever wanted to get in on the Airbnb gold rush? Maybe you’ve thought about creating your app like Airbnb, but don’t know how to start. Well, we’re here to help! We’ll walk you through all of the steps you need to take to build an app like Airbnb.
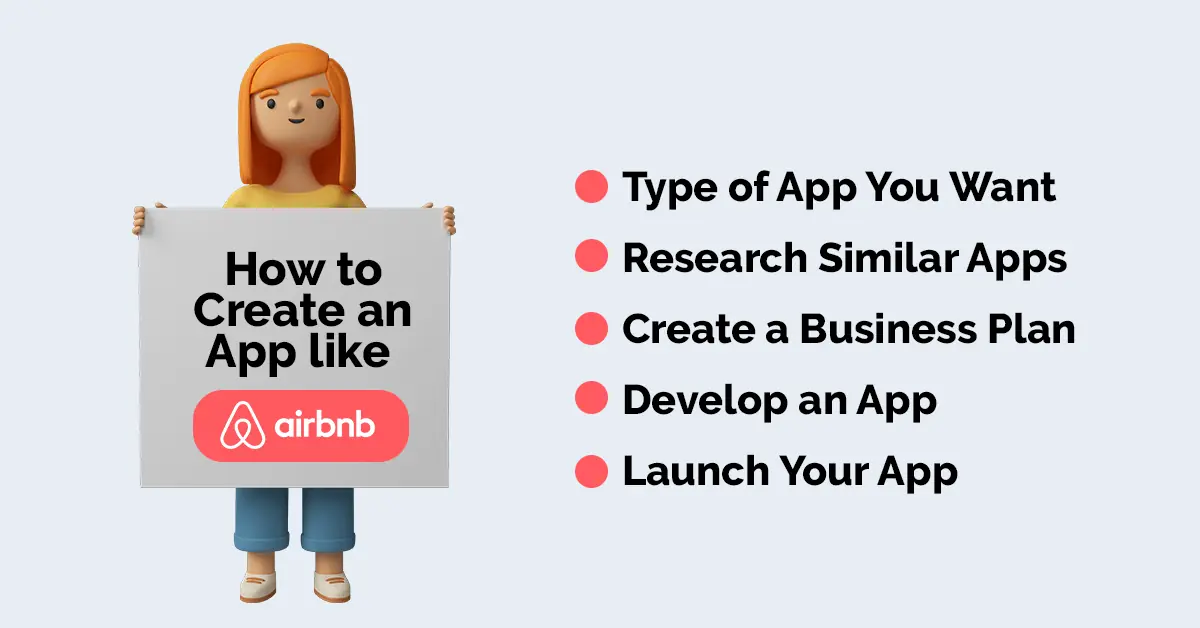
1. Decide What Type of App you Want to Create
Do you want a marketplace app, where people can list their properties? Or do you want an app that allows people to search for apartments or houses that are available for short-term rental?
2. Research Similar Apps and Determine
Know how they made their mark in the industry. What made them popular? How did they attract users? How did they set themselves apart from other similar apps?
3. Create a Business Plan for your App and Describe
Explore how it will function and what types of features it will have when it’s launched. This step is crucial because it will give you a better idea of whether or not your idea has potential as an investment opportunity or not!
4. Develop an App
The next step is developing an app using whatever platform you chose during step one above (website vs mobile phone vs computer). You should also consider whether or not this app will be free or paid for by users when they use it!
5. Launch your App
Make sure that everything works correctly before releasing it into the wild. you wouldn’t want people using your app only to find out later on that it didn’t work as advertised!
All these factors make Airbnb stand out from other travel websites because it gives users options outside of hotels or hostels – allowing them more freedom when planning their trip abroad!
How Much Does It Cost to Build an App Like Airbnb?
That depends on the type of app, who’s building it, and how much you want to spend. There are a lot of variables that go into creating a successful app, and each one affects the cost. Here are three factors you should consider as you decide how much it will cost to build your Airbnb-Esque app.
What Kind of Product Do You Want?
Determining what kind of product you want will help determine how much it costs to build your app. If you’re just looking for a basic version of Airbnb, then making one might not be too difficult or expensive.
But if you’re going for something more complex like a full-fledged version that allows users to book rooms and apartments without having to leave the site then expect those costs to be higher.
Top Leading Features of Airbnb App
The Airbnb app is a must-have for any service user, whether you’re a host or a guest. It allows you to search for listings and book them easily, track your payment history, and more. Here are some of the most important features you should know about.
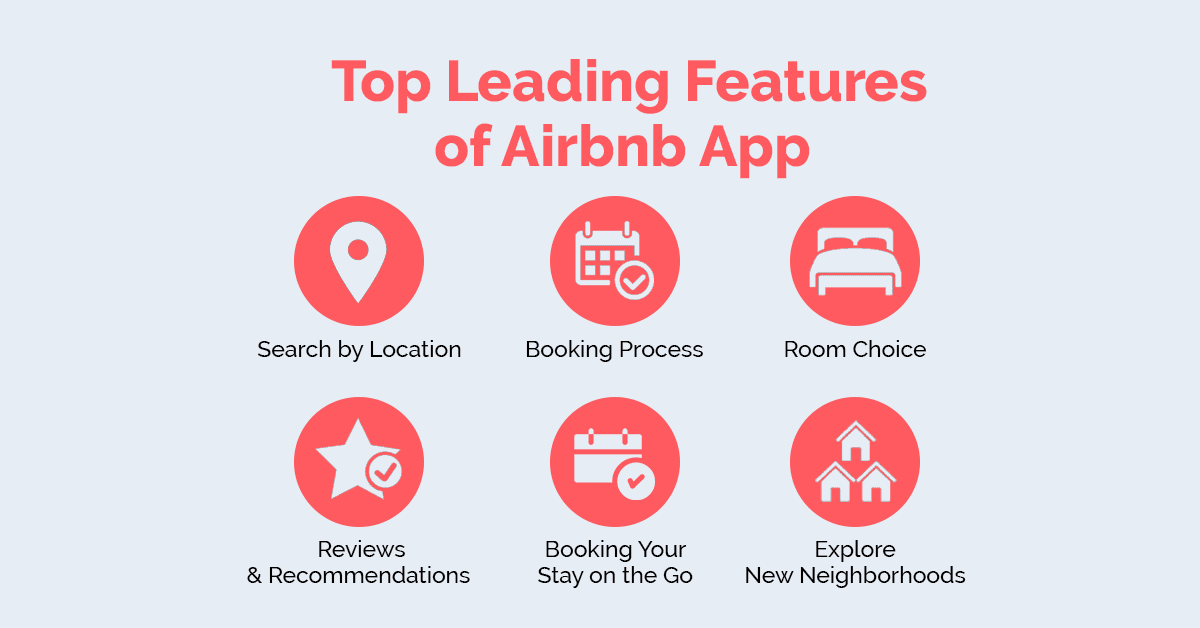
1. Search by Location
Search for listings anywhere in the world and get results immediately. You can filter by price, too, so you can find exactly what you’re looking for without having to wade through all of the options.
2. Booking Process
Booking a listing is simple just choose your dates and times, and then pay via your phone number or PayPal account. There’s no need to create an account or enter any personal information; just use your phone number to log in when prompted! You’ll be able to see your booking history with ease as well.
3. Explore New Neighborhoods
Did someone recommend an Airbnb listing in your area? Use the app’s search feature to find it right away.
4. Reviews & Recommendations
If there are reviews and recommendations available for the property, they will be displayed here so that you can see what other people thought about their stay at this Airbnb property before booking it for yourself.
5. Booking your Stay on the Go
With this mobile app, you can search for places to stay, book a room or an entire home, add dates and prices of travel, and even message hosts directly from your phone. It’s a great way to get started on planning your next trip!
6. Room Choice
The Airbnb app lets you select your room based on price, location, amenities, photos, and reviews. You can even choose between different types of accommodations, such as private rooms or shared spaces.

Why Choose OneClick to Build An App Like Airbnb
We know that creating an app like Airbnb is a huge undertaking. It’s not something you can just do on a whim. That’s why we’ve created the following list of reasons why you should choose OneClick to build your next business app:
- We have more experience and expertise in building apps like Airbnb than anyone else in the world.
- We have built multiple apps like Airbnb, so we know what it takes to do it right, and we know how to save you money by doing it ourselves rather than hiring outside developers who charge more for their services.
- We keep our overhead low by working from home and keeping overhead costs down, so we can pass these savings on to our customers!
Ending Notes
If you’re considering building an app like Airbnb, there are many things to consider. We’ve outlined some key aspects of the development process and estimated costs for each. Ultimately, the cost of your app development project will depend on its complexity and which features you choose to include in your app.