Build your own Cocoapods with help of OneClick IT Consultancy
Cocoapods is an excellent tool for managing third party dependencies in a project. It not only provides a way for easily integrating those dependencies but also allows you create your own dependencies and manage them as well.
For build own Cocoapods:
Step 1 :
Install Cocoapods in our Macbook.
For this open Terminal and paste this command to install cocoapods.
‘sudo gem install cocoapods’
Step 2 :
After installing Cocoapods in your Macbook, open terminal and paste this command to create new project library.
‘pod lib create (your project name)’
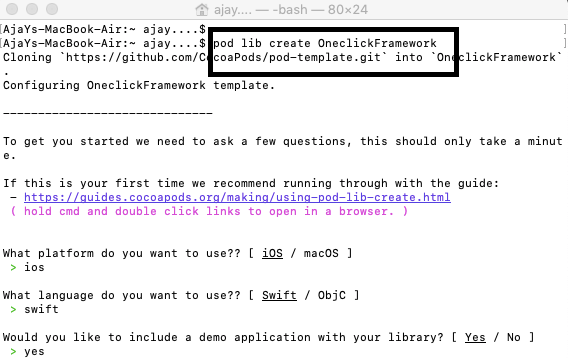
After that you need to login via your github account.
After login you need to give answers of some questions like which platform and which language you want to create pods.

After that this project opens automatically in your XCode.
Step 3 :
Now go to https://github.com and login via your account.
After login you need to create new repository for host your code.
Give same name of repository as your project name for consistency.

Step 4:
Now go to terminal and go to your project folder using
‘cd (your project folder)‘
After that paste this command to
git remote add origin “your repository URL”
Like this:

After this you need to push your project to your repository.
For that write these commands:
‘git add .’
‘git commit –m “your message” ’
‘git push –u origin master’
After that your repository look like this

Step 5:
Now go to your project. You can see project metadata folder.
In that folder there is LICENSE file .
Cocoapods require License for your project.
By default Cocoapods using MIT License .
Podspec file in Metadata is very important for your project.
It is telling Cocoapods that what version it is, and all metadata that require to create pods are placed in This “podspec” file.

After that you need to validate this podspec file using this command in terminal.
First write this command to specify swift version:
- ‘touch .swift-version’
- After that write
- ‘Echo “4.0” >.swift-version’
After that you can check your swift verison using:
‘cat .swift-version’
Now you can validate your podspec file using following command:
‘pod lib lint “your podspec file name” ’
If you face any warning issue, you can validate using:
‘pod lib lint “your podspec file name” –allow-warnings ’.

Step 6:
Now you can add files which you want to use as pods in classes files.

After adding add require files push code to github.
Using Following commands:
- ‘git add .’
- ‘git commit –m “your message” ’
- ‘git push –u origin master’
Step 7:
Now you need to add git tag to your project.
For this write following commands :
‘git tag your version -a’
Example:
- ‘git tag 0.1.0 -a’
You can add notes for this release.
Or you can simply add tag using:
‘git tag your version’
Example:
- ‘git tag 0.1.0’
After that you need to push this tag to git.
‘git push –tags’

Now Final step:
If you are creating pods first time, you need to register your session using following command:
‘pod trunk register “your github email id” ‘your gihub username’ –description= ‘Macbook’ ’
Example:
‘pod trunk register mishraajay95214@gmail.com ‘ajaymishra1’ –description=’Macbook’ ’
After that simply write following command and your Cocoapods is now ready to use by anyone:
‘pod trunk push’

Now this pod is available to everyone. You can use it in any project by entering following line into your podfile:
‘pod OneclickFramework’
This is an easy way when we are using same files or same logic to different projects. If you face any technical difficulties in build cocoapods feel free to contact our technical experts, we would love to resolve your queries. You can contact us here.