How to Use Dagger Hilt in Android? Step by Step Guidance

Introduction
First of all, we’ll know about DI (Dependency Injection) because by knowing the DI, we can better understand or relate the Dagger hilt in android development.
So the simple meaning of Dependency is, suppose that there is one class of students and another class called college. Here student class is dependent on class college. Without college class, there is no existence of student class. This scenario creates a dependency on one entity to another entity. For Overcoming these issues we can use the Dependency Injection theory in android development.
Dependency injection is one theory that creates a class independent of building the instances of needed functionalities of other classes. DI can disassociate the handling of instances from its construction.
The illustration of this technique is done by using the Dagger dependency injection framework. Dagger is a simple DI(Dependency Injection) tool to manage dependencies. Dagger is performed using Java’s annotations model.
Dagger will provide necessary objects. And gives us a service to inject these objects. On the other hand, it leads to the lifetime of the objects. That also assists us to create a clean code.

Hilt – The wrapper library on the dagger
The Finest way of implementing the Dependency Injection is “HILT” in android development. The built area of the hilt is at the top of the dagger.
Hilt is only used for android development. Hilt also created the dagger code behind the scenario of code generation. We can also call the advanced version of “Dagger”.
Why is it important?
The first and main important thing about the hilt is that Hilt is very easy compared to the dagger android. Hilt is given some predefined work that turns hilt into easy implementation for dependency injection.
There is a list of annotations that are provided by hilt for dependency injection:
@HiltAndroidApp,@Module,@InstallIn,@Provides,@Singleton, @HiltViewModel, @Inject, @Named.
Essential knowledge to implement dagger-hilt in android:
You should have clear the fundamentals of Android.
you should have some basic knowledge of what MVVM is and how MVVM architecture works in android.
You should have experience with anyone language properly, either Kotlin or Java.
Also, you should have a good understanding of OOPs concepts.
And basic ideas about annotations.
Quickly, let’s take one demo project of implementing dagger-hilt in android:
Don’t worry, there are only 7 simple steps for learning dagger-hilt implementation.
Step 1
Create one project and give it whatever name you want.
Step 2
After creating the project, set up the dependency work. Without dependencies, we can not implement or run the hilt in our android application.
build.gradleI(:app)
plugins {
   id 'com.android.application'
   id 'org.jetbrains.kotlin.android'
   id 'kotlin-kapt'
   id 'dagger.hilt.android.plugin'
}
dependencies {
   implementation 'androidx.core:core-ktx:1.7.0'
   implementation 'androidx.appcompat:appcompat:1.4.1'
   implementation 'com.google.android.material:material:1.5.0'
   implementation 'androidx.constraintlayout:constraintlayout:2.1.3'
   testImplementation 'junit:junit:4.13.2'
   androidTestImplementation 'androidx.test.ext:junit:1.1.3'
   androidTestImplementation 'androidx.test.espresso:espresso-core:3.4.0'

   //hilt
   implementation "com.google.dagger:hilt-android:2.38.1"
   kapt "com.google.dagger:hilt-compiler:2.38.1"
   implementation "androidx.activity:activity-ktx:1.4.0"
}

build.gradleI(:project)

buildscript {
   repositories {
       google()
       mavenCentral()
   }
   dependencies {
       classpath 'com.google.dagger:hilt-android-gradle-plugin:2.38.1'
   }
}
Step 3
Creating one application class. This application class will provide the needed context in some parts of coding. Use one annotation of hilt, that is @HiltAndroidApp this will look like the following :
package com.example.blog
import android.app.Application
import dagger.hilt.android.HiltAndroidApp
@HiltAndroidApp
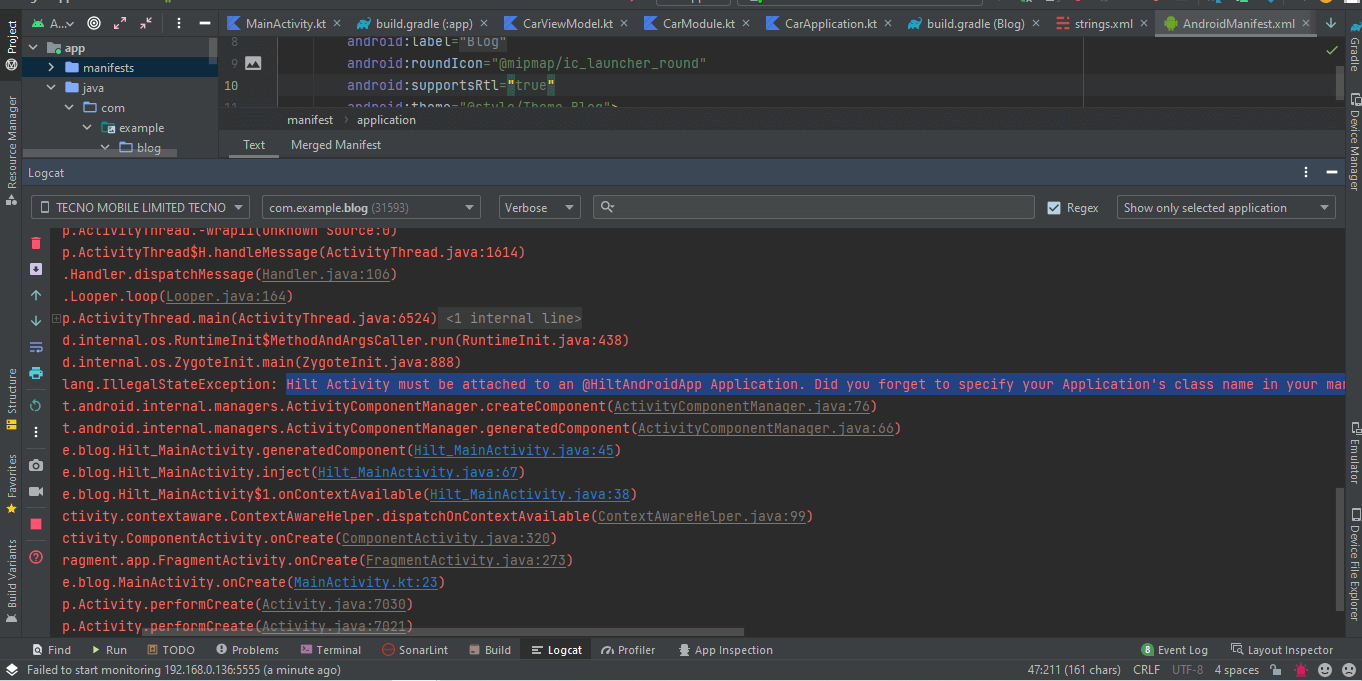
class CarApplication:Application()If in case of you will not provide this Application class then you will get some errors like this:
And remember one thing, you should set up the name of your application class in the manifest file.
<?xml version="1.0" encoding="utf-8"?>
<manifest xmlns:android="http://schemas.android.com/apk/res/android"
   package="com.example.blog">

   <application
       android:name=".CarApplication"
       android:allowBackup="true"
       android:icon="@mipmap/ic_launcher"
       android:label="@string/app_name"
       android:roundIcon="@mipmap/ic_launcher_round"
       android:supportsRtl="true"
       android:theme="@style/Theme.Blog">
       <activity
           android:name=".MainActivity"
           android:exported="true">
           <intent-filter>
               <action android:name="android.intent.action.MAIN" />

               <category android:name="android.intent.category.LAUNCHER" />
           </intent-filter>
       </activity>
   </application>

</manifest>
Step 4
We will create one data class Car in this step.
package com.example.blog
data class Car(
   val carName:String
)
After that in the parameter of the data class, we will pass one parameter called carName and take it as a string.
Step 5
After that, the Next step is about the creating our module class, In this demo project we will create a module class and give it a name like CarModule.kt
package com.example.blog

import android.content.Context
import dagger.Module
import dagger.Provides
import dagger.hilt.InstallIn
import dagger.hilt.android.qualifiers.ApplicationContext
import dagger.hilt.components.SingletonComponent
import javax.inject.Named
import javax.inject.Singleton
@Module
/**
* ApplicationComponent is deprecated now.
* So instead of this,now use "SingletonComponent".
*/
@InstallIn(SingletonComponent::class)
object CarModule {

   @Provides
   @Singleton
   @Named("CarStringFirst")
   fun providingTheRacingCar() = Car("Ferrari")

   @Provides
   @Singleton
   @Named("CarStringSecond")
   fun providingTheSimpleCar(@ApplicationContext context: Context): Car =
       Car(context.getString(R.string.inject_string))
}
We will take it as an object, And above that, we will put two annotations, one is @Module, and the second is @InstallIn. We have used @Module annotation because that annotation will notify us that this is a module class. In @InstallIn annotation, we will use SingletonComponent::class as a parameter that will create a ComponentFactory class in the background. As a SingletonComponent class, there is also one class as ActivityComponent::class this class works in activities. If you use your dependencies in the overall project then you can use the SingletonComponent class otherwise you can use ActivityComponent class. Like activity hilt also provides the component class for fragments. And this is called FragmentComponent::class. That all component classes work on their hierarchy. For knowing the hierarchy of component classes prefer this link to the official documentation of Android.
This module class has all the dependency functions that will be injected into consumer classes. Here in the demo prThis module class has all the dependency functions that will be injected into consumer classes. Here in the demo project, we have two dependency functions. On that function, we use some annotations like @Provides annotation and @Singleton annotation. @Provides annotation has use for providing the dependencies to inject annotations. @Singleton annotation creates a single object in the project and uses that for all classes. This annotation is very helpful when you don’t create more than one object of dependencies.
As you see here, there are two functions providingTheRacingCar and providingTheSimpleCar. Both functions provide two car’s names. You see there is one other annotation @Named, this annotation is very helpful for developers in doing their tasks. For Example, you can see there are two methods and they both provide a car name so hilt will be confused at that time. In this case, @Named will help to choose specific dependencies for specific @injection. Otherwise, hilt will be confused to choosing dependencies.
Step 6
Now here, In this step, we have taken MainActivity as an entry point of hilt dependency injection. Here @AndroidEntryPoint annotation is helpful to do this work of creating entry points to a class. This will provide us with hilt in various class.
package com.example.blog
import androidx.appcompat.app.AppCompatActivity
import android.os.Bundle
import android.util.Log
import androidx.activity.viewModels
import androidx.lifecycle.ViewModel
import dagger.hilt.android.AndroidEntryPoint
import javax.inject.Inject
import javax.inject.Named
@AndroidEntryPoint
class MainActivity : AppCompatActivity() {
@Inject
@Named("CarStringFirst")
lateinit var racingCar: Car
private val viewModel : CarViewModel by viewModels()
override fun onCreate(savedInstanceState: Bundle?) {
super.onCreate(savedInstanceState)
setContentView(R.layout.activity_main)
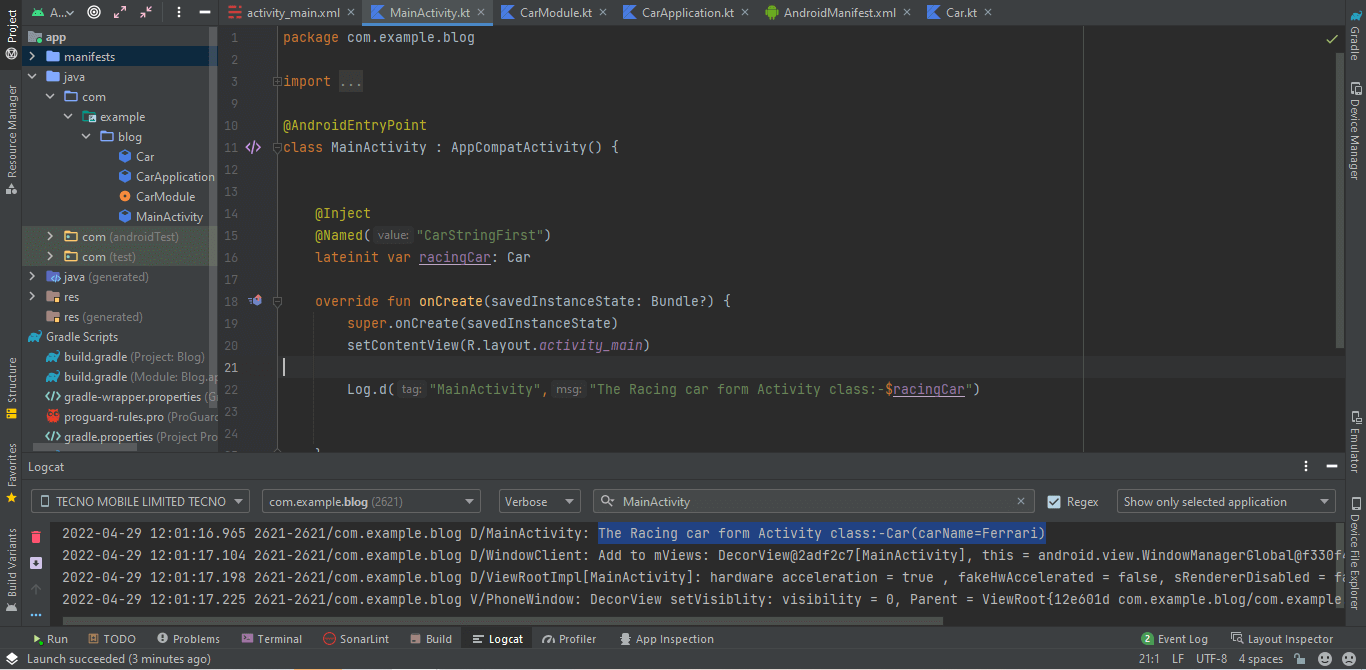
Log.d("MainActivity","The Racing car form Activity class:-${racingCar.toString()}")
viewModel
}
}
After knowing the @AndroidEntryPoint, we will create one lateinit var object called as racingCar and give his type as Car data class. And then we will inject the car dependency directly in racingCar . That will be possible by using @Inject annotation of hilt. Here hilt will get confused about which dependency to choose from as there are two functions in the module class that provides Car objects. So simply we have used the @Named to specify that we choose only racing car strings. For that, we have already given the Name as CarStringFirst to that string dependency.
If we have to choose a simple car name then we will inject the CarStringSecond to that object. And then We have to log that object for testing. If an object is injected successfully then the value of that dependency is shown in Logcat. Otherwise, logcat does not show that value. Here in MainActivity, We have also used one ViewModel that we will Know in the next step.
Step 7
In this step,We will create one ViewModel class.
package com.example.blog
import android.util.Log
import androidx.lifecycle.ViewModel
import dagger.hilt.android.lifecycle.HiltViewModel
import javax.inject.Inject
import javax.inject.Named
/**
* Now, you can not use '@ViewModelInject' annotation,
* because this is deprecated right now.
* So, Use '@HiltViewModel' above the class declaration and Inject as normal as other constructor injection method.
*/
@HiltViewModel
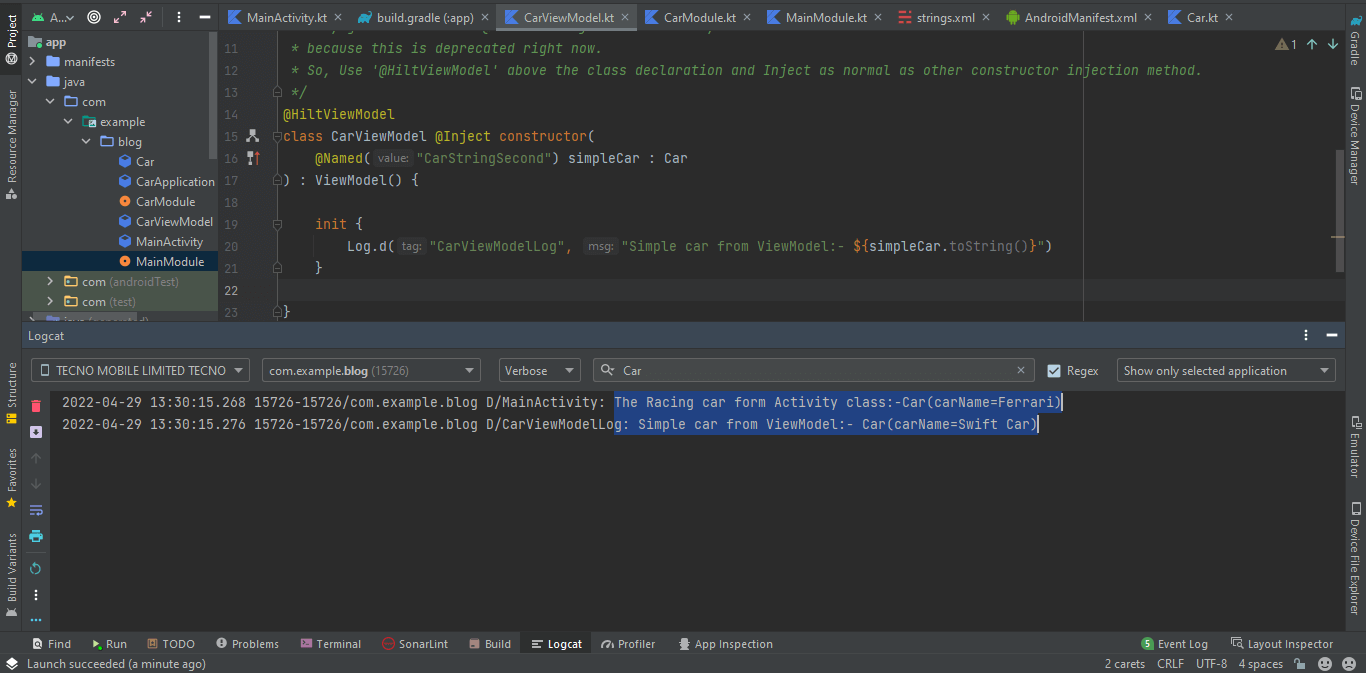
class CarViewModel @Inject constructor( @Named("CarStringSecond") simpleCar : Car ) : ViewModel() {
init {
Log.d("CarViewModelLog", "Simple car from ViewModel:- ${simpleCar.toString()}")
}
}
In the above code you can see, we have used one annotation called @HiltViewModel. This annotation is used for telling the hilt that this class is viewmodel class so treat that class as viewmodel class. Normally in other classes we use dependency injection directly, But here in this viewmodel class we can not do that method. In ViewModel, we can inject the dependencies in the constructor only. And after that injection we have used that required dependencies in the viewmodel class.
In this CarViewModel we have injected the dependency whose name is CarStringSecond. So that will give the value of a simple car function. And this code we have log that object which has injected the dependency of car string. After that we will run and check that logs in logcat and they all show our provided values.
First Log:
Second Log:
Conclusion
By considering this project we will conclude that hilt is a very standard way to implement the dependency injection in android development. By this example, we can understand how the dagger-hilt is implemented in android development. And we can relate the dagger and dagger-hilt easily. Accelerate your app development with our team of expert android developers who bring your ideas to life.

FAQs
Dagger-hilt has provided a standard way to implement the dependency injection in android application development. On the other hand, Dagger is used for handling a complex scenario compared to hilt.
In dagger, we have to create some component classes but hilt that is already provided. You have to only use their annotation and this will work.